


Online shoppers can’t finger through the racks and bins, they can’t try on that outfit and they certainly can’t hold it in their hands. Which is why great product photos is one of the most important elements for eCommerce websites to get right. Great product photos will sell products, it’s that simple. A product photo replaces all those options to touch, try and explore before buying.
But capturing the essence of a product in a way that makes customers comfortable about buying something they haven’t really seen, touched or held is certainly easier said than done. Hiring a professional will certainly get you those results — but spending a few hundred or even a few thousand dollars on a product photographer often isn’t in the budget, especially for small businesses and start-ups. That’s why we’ve condensed the process into three manageable steps that still get customers thinking Oh, I want that! at first glance.
Here’s what you need:
- A camera. You can probably snap some ok images with whatever camera you have on hand, but a camera with manual modes is ideal. To keep your budget low, you can also rent instead of buying.
- A tripod. Stabilizing the camera with a tripod allows for sharper images; they’re a big help when photographing still objects, such as in product photography.
- A large window. The good news is, you don’t need to invest in fancy lighting equipment because the best light is sunshine. You can set up near a large window, or even set up outside either on a cloudy day or in the shade.
- A thin or sheer white curtain. When the light is too bright, a sheer or lightweight white curtain is a big help. Alternatively, you can wait and shoot on a cloudy day.
- A photography reflector or a white piece of foam board. If you already own a photography reflector, great, if not you can pick up a white foam board for a couple bucks that will do the trick.
- A simple background. The idea is to draw attention to your product, so you don’t want a busy, elaborate background. For small products, inexpensive white foam boards will work. From recycled barn wood to bed sheets and shower curtains, there’s a lot of inexpensive options, just remember to keep it simple.
Step One: Getting Set Up For Product Photos
Arguably the most important aspect of product photography (besides including the product itself) is getting the lighting right. Sunlight is the best option, but direct sunlight is too harsh, with a lot of shadows. Instead, set up indoors near a big window during the day, preferably a window that faces north or south. While shadows can add drama to a photo, they’re best kept soft and minimal in product photography, so the product is viewable.
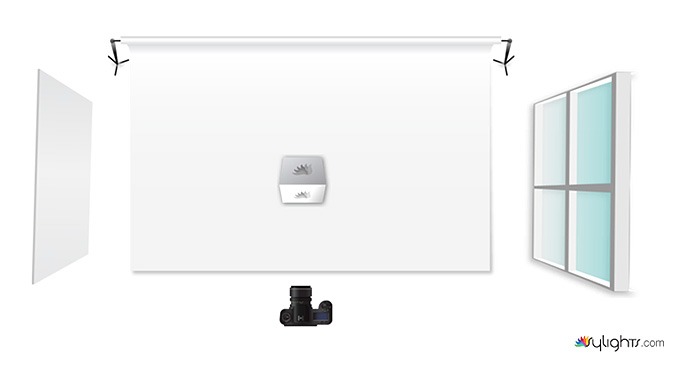
To achieve this even lighting that shows detail across the product, you’ll use the window light, and bounce some of that back off the reflector or white foam board placed parallel to the window (prop it upright with a heavy object behind it). The product will be placed in the middle, so that your lighting set-up looks like this (you can experiment with different camera angles as well):


If the shadows are still too harsh, you can hand a white or sheer curtain to filter the light, though often a north or south facing window doesn’t need a curtain, and cloudy days will have the same effect.
Of course, behind the product, you’ll want to use some sort of background besides your own kitchen. To keep the attention on your product, simple backgrounds are best. Two pieces of foam board or white sheets work well. Old barn wood or a well-worn table can work, or even non-reflective shower curtains, a simple print of fabric by the yard, or, of course, an actual photography backdrop.
With the backdrop, a window on one side and a reflector or piece of white foam board on one side, then you’re ready for, of course, the actual product. Place the product in the center, making sure that the background is wide enough for the entire shot.
Exactly how you angle it will depend on the shape of the product — watch where the shadows fall as you experiment with different angles. Don’t be afraid to shoot a few different angles and choose the best one later, or include multiple angles in your product listing.
If you can include multiple images, it’s a good idea to add another object in one picture to give an idea of scale, such as having someone hold the item in their hands.
Step 2: The Camera
So, your product is set up against a nice, simple backdrop with natural sunlight — what about the camera? Not all cameras are the same. Some are easier to use than others. And some don’t have the kind of control that you will need to do professional work.
A lot of the camera settings you use stem from the fact that product photography is a form of still life photography. Try to capture the action with these same settings, and you’ll end up with a blur. But since your products aren’t moving (or so we hope anyway), you can take sharp images with little noise just by using the right camera settings.
If you are using a camera with manual modes, it’s best for beginners to use aperture priority mode or the “A” on the dial. The aperture is how large the opening in the lens is, and along with controlling how much light is let in, it controls how much of the image is in focus.
For a soft, out-of-focus backgrounds, a large f-stop, or wider aperture, like f2.8 is good. However, if your product is deep, or if you are photographing a group of products, an f2.8 aperture will leave some of them out of focus. To photograph a group of products or a deep product, use a narrower aperture like f8 or f11. If you’re not sure, snap a picture and zoom in on the screen — if part of the product is out of focus, use a bigger f-number.
Aperture priority mode also allows you to control ISO. High ISOs are needed for low light conditions, but they make the image appear grainy. Since product photography is a type of still life, you don’t have to worry about blur. Use the lowest ISO setting your camera has, often ISO 100. Focus mode is also important here to capture a sharp product.
Head into your camera’s menu and look for an option called “focus area,” then select the single point autofocus. What this means is that the camera will focus on whatever point you select, instead of automatically choosing its own point. Use the camera’s arrow keys (or touchscreen, if your camera has one) to move the focus point over where your product is within the frame. This will help ensure your product is sharply focused.
One more thing — change the file type to RAW (or RAW + JPEG to shoot both types). RAW files offer more flexibility and editing, and you’ll get better results in the next step if you change the file type on your camera. Finally, set your camera up on a tripod. The low ISO may mean you’re shooting at a slow shutter speed, which will blur any movement. That’s fine for something that’s sitting still, like your product, but even tiny shakes in your hand will introduce blur to the entire image. Set the camera up on a tripod, and that slow shutter speed won’t matter.
It’s best to experiment with a few different compositions as well — move your tripod and camera from side to side, and take a few close-ups and a few from farther back.
Step 3: Editing Product Photos
You’ve set up the product and the camera settings and now actually have images on your camera — you’re done, right? Not so fast. Editing can make a big difference in your product photos and, if you shot in RAW as recommended from step two, editing is necessary.
The best option for editing RAW in Lightroom and Photoshop (available both for $10/month), but it’s not the only way. The software that came with your camera probably also has a RAW editor if your camera itself has RAW. There are also a few options you can download or use online, like UFRaw.
Armed with your RAW files and an editing program, here are a few things to check for before finalizing your images:
- Exposure. Is your picture too dark, or too light? Use the exposure slider to make sure the level of light is right. You can also use the brightness and contrast sliders until the image looks at it’s best, just using sparingly — it’s easy to spot an amateur with over-editing.
- White balance. Are the parts of the image that are supposed to be white, actually white? While different color hues may add artistic flair to other types of photography, you’ll want the color of your product to appear as true to life as possible. If the color is off, use the white balance slider until what’s supposed to be white in the image is actually white.
- Sharpen it. Unlike when you shoot with JPEG, the camera doesn’t do any processing of RAW files, so it’s up to you to sharpen the image. Zoom into 100 percent and use the sharpness slider on whichever editor you’ve chosen. Look for defined edges, but stop before you start to see individual pixels.
- Crop it. To keep the focus on your product, be sure to crop out any distracting elements. In general, it’s a good idea to fill most of the frame with the product, so the viewer can see more details.
That’s it — you’ve set up the product in the best possible way, captured it with the best camera settings and tweaked it in an editing program until you have a final image (or set of images) that replaces that need to finger through the racks or hold the item before making that purchase. Upload those images to your online store — chances are, you’ll start seeing more of those casual visitors becoming actual customers.